
The dumbbell pullover is an old-school bodybuilding move that can develop your chest or your last, depending on how it’s done. Just how effective it is, in either case, is quite debatable. In this article, we’ll lay out thirteen dumbbell pullover exercises that may give you better lat and pec activation.
Dumbbell Pullover Muscles Worked
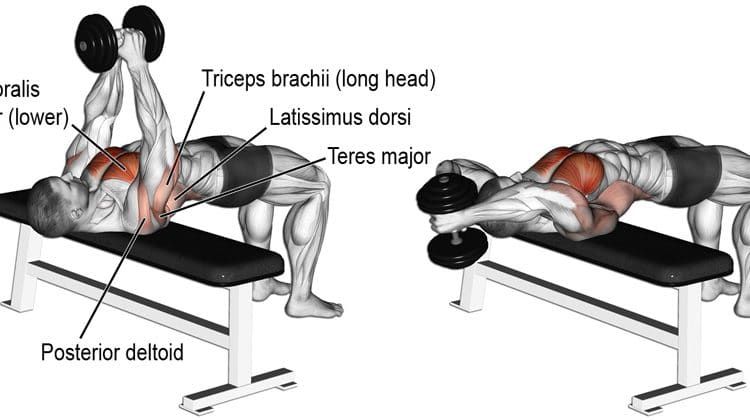
The main muscles worked with the dumbbell pullover are:
1. Pectorals
Pecs are located at the upper part of your torso and have a fan-like structure. The muscle fibers run from the top section of the humerus to the sternum, clavicles, and ribs. The pectorals’ job is to move the upper arm forward vertically and horizontally.
2. Latissimus Dorsi
The latissimus dorsi is the largest of the back muscles. It originates in the spine, with the muscle fibers running up diagonally to insert at the base of the humerus (upper arm bone). The main function of the lats is to pull the upper arm down and in toward the hip.
3. Front deltoids
There are three heads of the deltoids:
- Anterior
- Medial
- Posterior
The anterior (or front) delt head is involved in pressing the upper arm forward. It becomes engaged as the dumbbell is lifted from the overhead position in the dumbbell pullover exercise.
4. Serratus
The serratus is a small fan-shaped muscle covering the upper portion of the rib cage. It is often known as the boxer’s muscle because the punching action that is a boxer’s stock and trade develops it well. The main function of the serratus is the flexion and contraction of the scapula.
How To Perform the Dumbbell Pullover
There are two ways to do the dumbbell pullover, depending on whether you want to target your chest or lats.
Chest-Focused Dumbbell Pullover
Steps:
- Sit on a flat bench with a dumbbell held in both hands with your fingers interlocked around the dumbbell’s handle.
- Roll back to lie on the bench with the dumbbell held at arm’s length over your chest. Your head should be resting at the end of the bench. Now slide up the bench slightly so your head is hanging just off the edge.
- Without letting your elbows flare, extend your arms back over your head and down to the floor.
- Go down as far as possible while ensuring your hips don’t come off the bench.
- Reverse the motion to return to the start point. Flex your pecs in the top position.
Lat-Focused Dumbbell Pullover
Steps:
- Sit on a flat bench with a dumbbell held in both hands with your fingers interlocked around the dumbbell’s handle.
- Roll back to lie on the bench with the dumbbell held at arm’s length over your chest. Your head should be resting at the end of the bench. Now slide up the bench slightly so your head is hanging just off the edge.
- Flare your elbows outward and bend your elbows slightly, keeping them locked in that position.
- Now, extend your arms back over your head and down to the floor beyond your head. Do not bend your elbows; the entire movement should come from the shoulder joint.
- As you go down, allow your elbows to flare out even more. Go down as far as possible.
- Reverse the motion to return to the start point.
[sc name=”style-summary2″ ]
In the dumbbell pullover:
- Target Muscle Group: Pectorals / Latissimus Dorsi
- Secondary Muscles: Front deltoids, Triceps, and Core
- Type: Strength
- Mechanics: Isolation
- Equipment: Dumbbell
- Difficulty: Intermediate
- Best Rep Range:
- Hypertrophy: 8-12
- Strength: 1-5
[/sc]
Pro Tip:
- Use a moderate weight that you can control.
- Focus on contracting and extending the target muscle group.
- Stretch back over your head as far as possible.
[sc name=”style-summary-2nd” ]
Benefits:
- Increases chest and back strength
- Build muscle mass
- Enhances core stability
- Improves shoulder mobility
[/sc]
13 Best Dumbbell PullOver Alternatives
Given below are the thirteen best dumbbell pullover alternatives:
1. Machine Pullover
The machine pullover was developed to mimic and improve the standard dumbbell pullover exercise. This exercise does a very good job of isolating the lats and allowing you to move through a complete range of motion.
Being a pin-loaded weight machine, this version of the pullover makes it easier to adjust the resistance. Some people also find the inverted position of the dumbbell pullover quite uncomfortable, making this upright version a good alternative.
Steps:
- Adjust the seat height of the pullover machine. When seated on the machine, you want your shoulders to align with the machine’s pivot point. Now select the appropriate resistance on the weight stack.
- Sit on the machine and place your elbows on the pads.
- With your back flat against the pad, inhale deeply.
- Exhale as you press down with your elbows to bring the pads toward your ribs. Keep your upper back flat against the back pad as you do this (it is not a crunch).
- Slowly reverse the action to bring your arms back and then beyond the start position to end up with your elbows by your ears.
[sc name=”style-summary-2nd” ]
Pro tip: Focus on feeling the stretch through your lats; use a moderate weight that allows 12-15 reps.
[/sc]
Benefits of the machine pullover:
- More comfortable than the dumbbell version.
- Easy to adjust resistance.
[sc name=”style-summary-2nd” ]
This Exercise:
- Target Muscle Group: Latissimus dorsi
- Secondary Muscles: Front deltoids and Serratus
- Type: Hypertrophy
- Mechanics: Isolation
- Equipment: Machine
- Difficulty: Intermediate
- Best Rep Range:
- Hypertrophy: 8-12
- Strength: 1-5
[/sc]
2. Standing Cable Pullover
The standing cable pullover is more comfortable than the conventional dumbbell pullover. Some people experience a headache as the blood rushes to their brain in the dumbbell pullover. Doing the pullover with a cable machine makes it easy to select the required resistance level.
Steps:
- Set the pulley on a cable pulley machine at its highest setting and put a short bar handle on it.
- Stand about three feet in front of the machine, facing it. The cable should be taut at the starting position.
- Bend your knees and bring your torso to a 45-degree angle with the floor. Your arms should be extended at a similar angle with no bend in the elbows.
- Drive the handle down to your hip level. Do not change your torso position.
- Slowly return to the start position.
[sc name=”style-summary-2nd” ]
Pro tip: Use a moderate weight that allows you to focus on the stretch and contraction through the lats. You can also do the exercise with a rope handle. This will permit wrist rotation on the way down. By rotating your wrist inward as you go down, you will experience slightly more last engagement at the bottom.
[/sc]
Benefits of the standing cable pullover:
- More comfortable to perform than the dumbbell version
- Easier to adjust the resistance
- Can rotate wrists when done with a rope handle
[sc name=”style-summary-2nd” ]
This Exercise:
- Target Muscle Group: Latissimus dorsi
- Secondary Muscles: Front deltoids, Serratus
- Type: Hypertrophy
- Mechanics: Isolation
- Equipment: Cable Pulley
- Difficulty: Intermediate
- Best Rep Range: 12-15
[/sc]
3. Barbell Pullover
As with the dumbbell pullover, there are two ways to do the barbell pullover, depending on whether you wish to target the pectorals or the lats. The version described below targets the lats. To switch the emphasis to the pectorals, keep your elbows in and straighten the arms.
Steps:
- Sit on a flat bench, holding a barbell with an overhand grip and your thumbs 8-10 inches apart.
- Roll back to lie on the bench with the dumbbell held at arm’s length over your chest. Your head should be resting at the end of the bench. Now slide up the bench slightly so your head is hanging just off the edge.
- Flare your elbows and bend them slightly. Keeping them locked in this position throughout the exercise.
- Now, extend your arms back over your head. Do not bend your elbows; the entire movement should come from the shoulder joint.
- As you go down, allow your elbows to flare out even more. Go down as far as possible.
- Reverse the motion to return to the start point.
[sc name=”style-summary-2nd” ]
Pro tip:
- I recommend using an EZ Curl bar as it is easier on your wrists.
- Doing this exercise on a decline bench will increase your range of motion by 10-20 degrees.
[/sc]
Benefits of the barbell pullover:
- Can lift more weight than when done with a dumbbell
[sc name=”style-summary-2nd” ]
In the barbell pullover:
- Target Muscle Group: Pectorals / Latissimus dorsi
- Secondary Muscles: Front deltoids, Serratus
- Type: Hypertrophy
- Mechanics: Isolation
- Equipment: Barbell
- Difficulty: Intermediate
- Best Rep Range: 12-15
[/sc]
4. Lying Cable Pullover
The lying cable pullover more closely replicates the dumbbell pullover plane of motion. It allows for a greater stretch through the range of motion, especially when targeting the lats.
Steps:
- Place a flat bench about three feet in front of a cable pulley machine. Now set the cable pulley about six inches higher than the level of the bench. Attach a short handle to the cable.
- Lie on the bench with your head toward the machine.
- Grab the handle with an overhand grip.
- In the start position, your arms should be directly overhead and your arms slightly bent but locked in place.
- Pivot from the shoulder joint to drive your arms down to your waist.
- Slowly return to the start position.
[sc name=”style-summary-2nd” ]
Pro tip: Keep your head and shoulders down throughout the movement. You can change the target muscle by changing the height of the pulley. If you set it about a foot above your head level, the emphasis will switch from the lats to the trapezius, rhomboids, and rear deltoids.
[/sc]
Benefits of the lying cable pullover:
- Better mimics the dumbbell pullover than the standing cable pullover
[sc name=”style-summary-2nd” ]
This Exercise:
- Target Muscle Group: Latissimus dorsi
- Secondary Muscles: Front deltoids, Serratus
- Type: Hypertrophy
- Mechanics: Isolation
- Equipment: Cable pulley machine
- Difficulty: Intermediate
- Best Rep Range: 12-15
[/sc]
5. Standing Band Pullover
The standing band pullover is a home-friendly dumbbell pullover variation that can be done anywhere, provided you’ve got an inexpensive resistance band.
Steps:
- Attach a resistance band anchor to the top of a door, then securely close the door. Loop the band through the anchor and grab the handles with an overhand grip.
- Stand about three feet away from the anchor point, facing it. In the start position, the band should be taut when your arms are extended.
- Bend your knees slightly and bring your torso down to a 45-degree angle.
- From a start position with your arms extended, drive the band down to your hip level. Do not move your torso position.
- Slowly return to the start position.
[sc name=”style-summary-2nd” ]
Pro tip: To increase the resistance, move further away from the anchor point. You can also make the exercise more intense by performing a 2-3 second hold in the bottom position of the exercise.
[/sc]
Benefits of the standing band pullover:
- Can be done anywhere
[sc name=”style-summary-2nd” ]
This Exercise:
- Target Muscle Group: Latissimus dorsi
- Secondary Muscles: Front deltoids, Serratus
- Type: Hypertrophy
- Mechanics: Isolation
- Equipment: Resistance band
- Difficulty: Intermediate
- Best Rep Range: 12-15
[/sc]
6. Lying Banded Pullover
The lying banded pullover is better at simulating the movement pattern of the dumbbell pullover than the standing version. It also offers a better range of motion. We recommend experimenting with the two versions to see which works better for you.
Steps:
- Attach a band anchor to a pole about two feet from the floor. Now, loop a resistance band through the anchor. Alternatively, you could wrap the band around the elevated object.
- Place a flat bench about three feet in front of the anchor point.
- Lie on the bench with your head on the pole’s side.
- Grab the band handle with an overhand grip. In the start position, your arms should be directly overhead, and your elbows slightly bent but locked in place.
- Pivot from the shoulder joint to drive your arms toward your waist.
- Slowly return to the start position.
[sc name=”style-summary-2nd” ]
Pro tip: To make the exercise harder, move the bench further away from the anchor point.
[/sc]
Benefits of the lying banded pullover:
- Moves through the same plane of motion as the dumbbell pullover
[sc name=”style-summary-2nd” ]
This Exercise:
- Target Muscle Group: Latissimus dorsi
- Secondary Muscles: Front deltoids, Serratus
- Type: Hypertrophy
- Mechanics: Isolation
- Equipment: Resistance band, flat weight bench
- Difficulty: Intermediate
- Best Rep Range: 12-15
[/sc]
7. High Pulley Lateral Extension
The high pulley lateral extension is a unilateral alternative to the dumbbell pullover that keeps constant tension on the muscles while allowing for excellent isolation. It is best done on a cable crossover machine.
Steps:
- Stand in the middle of a cable crossover or a functional trainer machine with the cable pulleys set at their highest point. Remove the handles from the cables.
- Grab the left cable with the right hand and vice versa. In this position, your forearms will be crossed over.
- In the start position, your arms should be extended over your head. The cable should be taut in the start position.
- Bring your arms down to just below shoulder level without bending your elbows.
- Return to the start position under control and repeat for the required rep count.
[sc name=”style-summary-2nd” ]
Pro tip: To make the exercise more challenging, bend your knees slightly and bend your torso so it is at a 30-degree angle to the floor.
[/sc]
Benefits of the band chest fly:
- A great unilateral exercise to help overcome strength and muscle imbalance
[sc name=”style-summary-2nd” ]
This Exercise:
- Target Muscle Group: Latissimus dorsi
- Secondary Muscles: Front deltoids, Rear deltoids
- Type: Hypertrophy
- Mechanics: Isolation
- Equipment: Double cable pulley machine
- Difficulty: Advanced
- Best Rep Range: 10-20
[/sc]
8. Decline Chest Fly
The decline flye is a good alternative to the chest version of the dumbbell pullover. The decline flye moves your pecs through a full range of motion, activating all muscle fibers. When you use a decline bench, you can better simulate the natural forward movement of the pecs, which is inward and slightly down.
Steps:
- Adjust the angle of an adjustable bench to a 30-degree decline.
- Lie on the bench with a dumbbell in each hand.
- Extend your arms directly above mid-chest level with your elbows slightly bent.
- Hinge from the shoulder joint as you bring the dumbbells out and down to your torso level.
- Return to the start position, so that the dumbbells touch each other at the top.
[sc name=”style-summary-2nd” ]
Pro tip: Do not bring your elbows below your torso level to avoid stressing the rotator cuff.
[/sc]
Benefits of the decline fly:
- Full pec activation through its range of motion
[sc name=”style-summary-2nd” ]
This Exercise:
- Target Muscle Group: Pectorals
- Secondary Muscles: Triceps and Front deltoids
- Type: Hypertrophy
- Mechanics: Isolation
- Equipment: adjustable bench, dumbbells
- Difficulty: Intermediate
- Best Rep Range: 8-12
[/sc]
9. Dumbbell Fly
The dumbbell fly allows you to move the pectorals through the horizontal and vertical planes to achieve a full range of motion. However, you should avoid lowering your arms below your torso level to prevent stress on the shoulder joint.
Steps:
- Lie on a flat bench with a relatively light pair of dumbbells in your hands. Plant your feet on the floor.
- Maintain a natural arch in your lower back with your hips and shoulder blades on the bench.
- Hold the dumbbells directly above your mid-chest, with your elbows slightly bent. The elbows must remain locked in this position through the movement.
- Hinging from the shoulder joint, bring the arms out and down in a slow, controlled manner.
- Stop when your hands are in line with your torso (do not go any lower).
- Reverse to the start position.
[sc name=”style-summary-2nd” ]
Pro tip:
- Use a moderate weight that you can control.
- Do not bring your elbows below your torso level to avoid stressing your rotator cuffs.
- Imagine you are hugging a tree.
[/sc]
Benefits of the dumbbell flye:
- Moves the pectorals through both horizontal and vertical adduction to provide a full range of motion
[sc name=”style-summary-2nd” ]
In the dumbbell fly:
- Target Muscle Group: Pectorals
- Secondary Muscles: Front deltoids and triceps
- Type: Hypertrophy
- Mechanics: Isolation
- Equipment: Dumbbells
- Difficulty: Intermediate
- Best Rep Range:
- Hypertrophy: 8-12
- Strength: 1-5
[/sc]
10. Slider Push-Up
The slider push-up is another chest exercise that allows you to perform both horizontal adduction and vertical pressing in one exercise. The sliders under your hands allow you to move your arms in and out while performing the push-up movement.
Steps:
- Get down on a slick floor (such as polished hardwood or kitchen tiles) in the high plank position with a pair of sliders under your hands.
- Spread your hands apart until your chest is a few inches away from the floor.
- Slide your hands in together and begin to perform a push-up.
- Return to the start position.
[sc name=”style-summary-2nd” ]
Pro tip:
- If you don’t have sliders, you can put a pair of hand towels under your palms.
- Perform the exercise slowly and under control.
[/sc]
Benefits of the slider push-up:
- Combine horizontal adduction with vertical pressing.
[sc name=”style-summary-2nd” ]
This Exercise:
- Target Muscle Group: Pectorals
- Secondary Muscles: Triceps and front deltoids
- Type: Hypertrophy
- Mechanics: Compound
- Equipment: Sliders
- Difficulty: Intermediate
- Best Rep Range: 10-20
[/sc]
11. Wide-Grip Bench Press
The wide-grip bench press requires greater horizontal adduction than the standard grip bench press. You will not be able to use as much weight but will be able to combine vertical pressing and horizontal adduction in a single movement.
Steps:
- Add an appropriate weight to the bar.
- Lie on the bench with your feet planted firmly on the floor. Maintain a natural back arch with your hips and shoulder blades on the bench.
- Grab the bar about three inches wider than shoulder width.
- Unrack the bar and bring it out over your mid-chest.
- Lower under control until your upper arms are parallel to the floor.
- Press back to the start position.
[sc name=”style-summary-2nd” ]
Pro tip: Reduce the weight by about 25 percent compared to your standard bench press hand width.
[/sc]
Benefits of the wide-grip bench press:
- More horizontal adduction than the standard bench press
- Vertical pressing plus horizontal adduction in a single movement
[sc name=”style-summary-2nd” ]
This Exercise:
- Target Muscle Group: Pectorals
- Secondary Muscles: Triceps and Front deltoids
- Type: Hypertrophy
- Mechanics: Compound
- Equipment: Bench press
- Difficulty: Intermediate
- Best Rep Range:
- Hypertrophy: 8-12
- Strength: 1-5
[/sc]
12. Seal Row
The seal row have you lying flat on a bench as your row vertically. This prevents you from cheating by using momentum to bring the bar up.
Steps:
- Place 45-pound plates underneath each side of a flat bench to increase its height (or use a specialized seal row bench).
- Position a dumbbell on each side of the bench.
- Lay on your stomach on the bench and extend your arms so that you can hold the dumbbells with an overhand, pronated grip at shoulder width.
- Lift your chest, depress your shoulder blades, and press your stomach against the bench.
- Pull the dumbbells up to the bench. At the top, squeeze your shoulder blades together, and tighten your lats.
- Lower under control.
[sc name=”style-summary-2nd” ]
Pro tip: Focus on stretching your lats at the bottom and squeezing them at the top.
[/sc]
Benefits of the Seal Row:
- Eliminates momentum
- Lower back-friendly
[sc name=”style-summary-2nd” ]
This Exercise:
- Target Muscle Group: Latissimus dorsi
- Secondary Muscles: Trapezius, rhomboids, rear deltoids, and biceps
- Type: Hypertrophy
- Mechanics: Compound
- Equipment: Dumbbells
- Difficulty: Beginner
- Best Rep Range:
- Hypertrophy: 8-12
- Strength: 1-5
[/sc]
13. TRX Pullover
The TRX Pullover uses your body weight as the resistance as you work against gravity. It also introduces instability to the movement and works the small stabilizing muscles of your body.
Steps:
- Stand under the TRX band.
- Grab the strap handles overhead with your arms extended.
- Lean your body forward to form a 30-degree angle with the floor. Your body should be in a straight line at this point.
- From this starting position, pivot from the shoulders to bring your arms down to waist level. Do not bend your elbows.
- Reverse and repeat.
[sc name=”style-summary-2nd” ]
Pro tip: Keep your core tight and your lats engaged throughout the entire movement.
[/sc]
Benefits of the TRX Pullover:
- Isolates the lats while also engaging the core.
[sc name=”style-summary-2nd” ]
This Exercise:
- Target Muscle Group: Latissimus dorsi
- Secondary Muscles: Abdominals, deltoids, trapezius, and triceps
- Type: Hypertrophy
- Mechanics: Isolation
- Equipment: TRX Bands
- Difficulty: Intermediate
- Best Rep Range:
- Hypertrophy: 8-15
- Strength: 5-8
[/sc]
FAQs
Is the dumbbell pullover a lat or a chest exercise?
The dumbbell pullover can target the lats or the chest, depending on how you perform the exercise. To focus on the lats, keep your arm straight as you push the dumbbell over your head.
If you want to target the chest, bend your arms and bring the dumbbell toward the floor over your head.
Can you enlarge your ribcage by doing the dumbbell pullover?
No, you cannot enlarge the ribcage by doing the pullover. The rib cage is made up of bones. Once the growth that occurs during puberty has concluded, their thickness will be set.
How much weight should I use on the dumbbell pullover?
Use a moderate weight on the dumbbell pullover that allows you to concentrate on feeling the stretch and contraction of the movement rather than controlling the weight in your hands. Most trainers start with between 20-30 pounds.
Wrapping Up
The dumbbell pullover is an effective chest and back developer that gives you a better range of motion than most exercises. However, some people find it uncomfortable. If you’re among them or want to add some variety to your workout, give each of our dumbbell pullover alternatives a try.
Switch between the alternative exercises in your back and chest routines. We recommend doing pullovers as a finisher after completing heavy pressing (for chest) or pulling (for back) moves to end your workouts with a nasty pump.
 You can also follow us on Twitter, Facebook, Instagram, and
YouTube for even more content.
You can also follow us on Twitter, Facebook, Instagram, and
YouTube for even more content.