Go to any gym, and you’ll see people working out with exercise equipment. They’ll be lifting weights, pulling cables, running on treadmills, riding bikes, and swinging kettlebells. And while all these training tools are valid and effective, it could also be argued that many of them are unnecessary.
The reality is that you can get in great shape using nothing but your body weight and an exercise mat. So, armed with these things, you can work virtually every muscle in your body and without going to a gym.
In fact, you can have a great workout anywhere and anytime – even at home. Or, why not put your exercise mat in your bag and have a workout at the park or the beach?
In this article, we reveal some of the best mat exercises for your upper body, lower body, and core. Use these exercises in your mat workouts.
The Best Mat exercises – Upper Body
When it comes to upper body exercises, most people gravitate toward barbells, dumbbells, and machines. However, you can get a pretty good workout using nothing but an exercise mat.
1. Push-up
While you don’t need a mat for push-ups, using one may make your workout more comfortable and effective. With a mat, you have a padded surface for your hands and a handy reference point to make sure you always do push-ups with the same hand position.
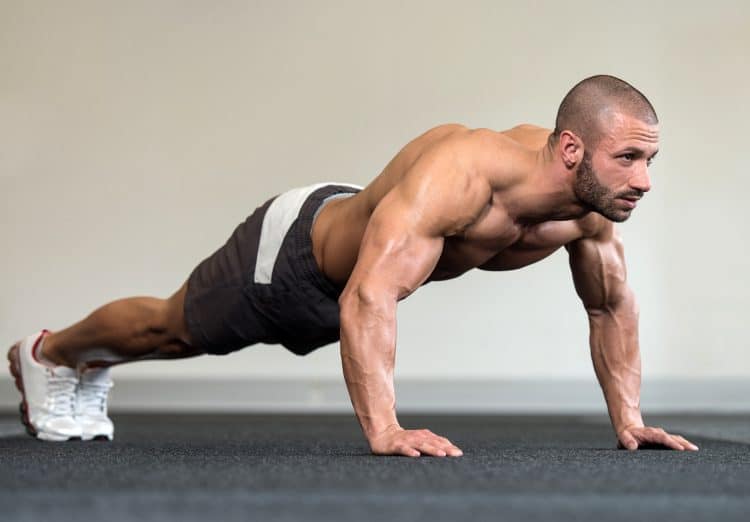
How to do it:
- Squat down and place your hands on your mat, fingers pointing forward. Your hands should be roughly shoulder-width apart.
- Walk your feet back, so your body is straight.
- Brace your abs and pull your shoulders down and back.
- Bend your arms and lower your chest down to within an inch of the mat. Do not thrust your head down toward the floor. Instead, keep your neck neutral.
- Extend your arms and push yourself back until your elbows are straight but not locked.
- Repeat for the desired number of reps.
- Make push-ups easier by bending your legs and resting on your knees. The closer your knees are to your hands, the easier push-ups become.
2. Hand-release push-ups
If there is a disadvantage to push-ups, it’s that they only work your pushing muscles and leave your back muscles untrained. That all changes with hand-release push-ups, which also work your upper back.
How to do it:
- Squat down and place your hands on your mat, fingers pointing forward. Your hands should be roughly shoulder-width apart.
- Walk your feet back, so your body is straight. Brace your abs and pull your shoulders down and back.
- Bend your arms until your chest is resting on the floor.
- Pull your shoulders back and, leading with your elbows, lift your hands a few inches off the floor.
- Place your hands back on the floor, and then push yourself up until your arms are straight but not locked.
- Make this exercise easier by bending your legs and resting on your knees.
3. Triceps dip
Dips are usually done on parallel bars, on the edge of a chair or exercise bench, or with a special dip machine. However, you can also do this exercise with nothing more than an exercise mat. Triceps dips are a good exercise for toning and strengthening the muscles on the back of your arms.
How to do it:
- Sit on your exercise mat. Bend your legs and place your feet flat on the floor. Put your hands flat on the floor by your hips, so your fingers are pointing forward.
- Lift your butt off the floor, so your weight is supported on your hands and feet only.
- Bend your arms and lower your butt down toward the floor, and your elbows are bent to around 90 degrees.
- Extend your arms and repeat.
4. Pike push-up
Regular push-ups (exercise #1) work your chest, shoulders, and triceps. Pike push-ups increase shoulder muscle activation and simulate doing overhead presses with weights. While this is a challenging exercise, if you want stronger, shapelier shoulders, pike push-ups will help!
How to do it:
- Adopt the push-up position with your arms and legs straight, and your core braced. Your hands should be around shoulder-width apart.
- Lift your hips up toward the ceiling, so your body forms an inverted V.
- Bend your arms and lower your head down toward the floor.
- Extend your arms and repeat.
5. Shoulder YTIs
Shoulder YTIs are actually three exercises rolled into one. They work your upper back and shoulders and are very good for your posture. Best of all, the only thing you need to do this exercise is a comfortable mat.
How to do it:
- Lie prone on your mat with your forehead resting on the floor. Extend your arms in front of you, so your hands are slightly wider than shoulder-width apart and form a Y shape. Point your thumbs up toward the ceiling.
- Keep your arms straight, raise them a few inches off the floor and lower them again. Repeat 10-15 times.
- Next, move your arms down, so your hands are level with your shoulders. Your body should now look like a T. Raise your arms a few inches off the floor and then lower them again. Repeat 10-15 times.
- Finally, move your arms down by your sides to form an I shape. As before, lift your arms a few inches off the floor and then lower them. Repeat 10-15 times.
6. Diamond push-up
All push-up variations work your triceps, but this variation is especially triceps-centric. However, it’s also harder than many other push-up variations, so only attempt this exercise if you’ve already got reasonably strong arms.
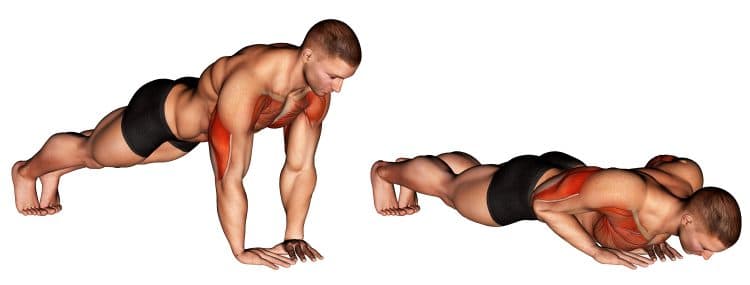
How to do it:
- Adopt the push-up position with your arms and legs straight, and your core braced. Position your hands so they’re directly below your chest and your thumbs and first fingers form a diamond shape.
- Bend your arms and lower your chest to your hands.
- Push yourself back up until your arms are straight, and repeat.
- Make this exercise easier by bending your legs and resting on your knees.
7. Yoga push-up
Yep, it’s another push-up variation! But, this one is part strength builder and part shoulder and upper back mobilizer. Do yoga push-ups to work your chest, back, shoulders, and arms simultaneously or in your warm-up to prepare your upper body for more demanding exercises.
How to do it:
- Adopt the push-up position with your arms and body straight. Brace your core.
- Inhale and lower your chest to the floor.
- Exhale, extend your arms, and push your hips back and up to form an inverted V. Lower your head between your arms to gently open your shoulders.
- Move forward and back down into the push-up position and repeat.
The Best Mat exercises – Lower Body
Squats, leg presses, and deadlifts are among the best lower body exercises you can do. But, on the downside, you need equipment to do them. The good news is you can also work your legs with just an exercise mat.
1. Lunges
You don’t need a mat for lunges, but they can help make this exercise better. Use your mat to make sure you take the same length step for each and every rep. Also, if you inadvertently lower your back knee to the floor, using a mat could help prevent bruises.
How to do it:
- Stand with your toes against the side edge of your exercise mat. Pull your shoulders down and back and look straight ahead.
- Step forward and across your mat, so your heel lands just past the opposite edge.
- Bend your legs and lower your rear knee down to about an inch above the mat. Your front shin and torso should remain relatively vertical.
- Push off your front leg and return to the starting position.
- Do your next repetition with the opposite leg.
- Alternate legs for the duration of your set.
2. Glute bridge
Glute bridges target your hamstrings and glutes. While this is a straightforward exercise, it’s still an effective one. Make it even better by wearing a booty band around your legs to increase glute muscle activation.
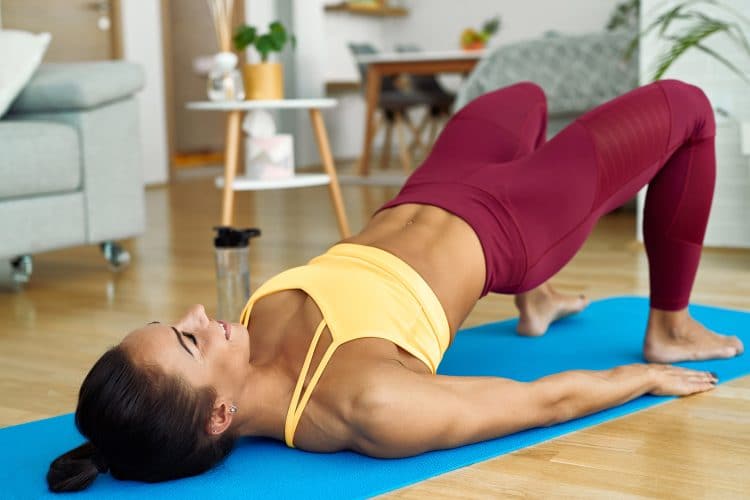
How to do it:
- Lie on your exercise mat with your legs bent and feet flat. Your feet should be about shoulder-width apart.
- Push your feet into the floor and lift your hips up toward the ceiling.
- Lower your butt back down to the floor and repeat.
- You can also do this exercise unilaterally, i.e., one leg at a time.
Read also: Best glute bridge alternatives
3. Kneeling squat
Kneeling squats work your quadriceps, which are the muscles on the front of your thighs, and your glutes. It’s also a good exercise for mobilizing your knees and hips. However, if you have a history of knee pain, take care doing this exercise as it could make pre-existing knee problems worse.
How to do it:
- Fold the end of your mat over a couple of times to form a pad. Kneel on this section of the mat with your knees about shoulder-width apart. Your thighs should be vertical, and your glutes engaged.
- Push your hips backward, bend your knees, and lower your butt down to lightly touch your heels.
- Extend your knees and push your hips forward and up to return to the starting position.
4. Fire hydrants
Fire hydrants are so-called because, when you do them, you look a little like a dog lifting its leg to pee! For this reason, they’re also known as Rover’s revenges. Funny names aside, fire hydrants work the outside of your hips and thighs, which can help give you a shapelier butt.
How to do it:
- Kneel on your mat on all fours so your shoulders are over your hands and your hips are over your knees. Your knees and hands should be roughly shoulder-width apart. Brace your core and look straight down at the floor.
- Lift one knee and inch off the floor and raise it up and out to the side, taking care not to twist your shoulders or hips.
- Return to the starting position and repeat.
- Do the same number of repetitions on both legs.
5. Donkey kicks
Donkey kicks are very similar to fire hydrants, but you push your leg back and up instead of lifting your leg out to the side. This increases glute and hamstring activation.
However, as both exercises are equally effective, you could alternate between them to work your butt from all available angles, i.e., do one rep of fire hydrants followed by one rep of donkey kicks.
How to do it:
- Kneel on your mat on all fours so your shoulders are over your hands and your hips are over your knees. Your knees and hands should be roughly shoulder-width apart. Brace your core and look straight down at the floor.
- Lift one knee an inch off the floor, and then, keeping your leg bent, push your heel back and up toward the ceiling. Take care not to hyperextend your spine.
- Return to the starting position and repeat.
- Do the same number of repetitions on both legs.
6. Frog pumps
Frog pumps are one of the most all-encompassing glutes and hip mat exercises you can do. They combine hip extension with external rotation to work multiple lower body muscles. If you need a quick but effective glute workout, this is the one to choose.
How to do it:
- Lie supine on your mat with your legs bent, knees apart, and feet pressed together so you look a little like a frog.
- Push your knees outward, drive the outside of your feet into the floor, and lift your hips up toward the ceiling.
- Lower your butt back down to the floor and repeat.
7. Side-lying leg lift
This exercise hits the outside of your hips and thighs – the adductor muscles. Unlike most leg exercises, it does not involve your knees, making it ideal for anyone suffering from knee pain. Make this exercise harder by wearing ankle weights or using a booty band.
How to do it:
- Lie on your side with your legs straight and hips and shoulders square. Rest your head on your outstretched arm. Brace your abs.
- Without leaning forward or backward, lift your uppermost leg until your foot is just above shoulder height.
- Lower your leg and repeat.
- Roll over and do the same number of reps on both sides.
The Best Mat Exercises – Core
The core is the collective term for the muscles of your midsection. These include the rectus abdominis, transverse abdominis, obliques, and erector spinae muscles. A strong core can help prevent back pain as these muscles help stabilize your spine. Additionally, a well-developed core can help give you a toned abdomen and waist.
1. Plank
Planks are a classic core exercise. They teach you to brace your abs and stabilize your spine. All you need for planks is an exercise mat, making them the perfect exercise for home workouts.
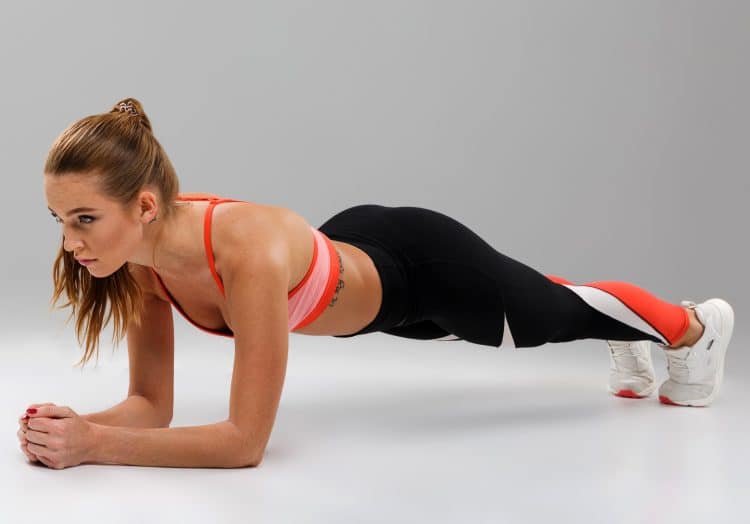
How to do it:
- Lie on your front on your exercise mat. Rest your upper body on your elbows and forearms. Brace your abs.
- Straighten your body and lift your hips off the floor.
- Maintain this position for the desired duration, e.g., 30 seconds. Take care not to hold your breath.
- Lower your hips back down to the floor, rest a moment, and repeat.
2. High bird dog
Bird dog are usually done while kneeling. That’s a decent option for beginners but not usually intense enough for more experienced exercisers. The high bird dog is a much more challenging exercise and should provide a far more intense workout.
How to do it:
- Adopt the push-up or high plank position with your arms, legs, and body straight. Brace your core.
- Without twisting your shoulders or hips, lift your left hand and right foot to roughly parallel to the ground. Hold this position for 3-5 seconds.
- Lower your limbs and then repeat on the opposite side.
- Continue alternating sides for the duration of your set.
- Make this exercise easier by doing kneeling bird dogs.
3. Alternating leg lowers
Double leg raises are a popular old-school abs exercise. However, it’s tough to do them without letting your lower back lift off the floor. The resulting lumbar spine hyperextension a) makes the exercise less effective and b) could result in back injury. Moving one leg at a time is a much safer option and, as an added benefit, increases oblique muscle activation.
How to do it:
- Lie on your back with your arms extended straight at your sides.
- Brace your abs and lift your legs until your feet are over your hips and your knees are relatively straight.
- Keeping your left leg stationary, lower your right leg until your heel touches the floor lightly. Keep your lower back pressed flat.
- Return to the starting position and repeat with your left leg.
- Alternate legs for the duration of your set.
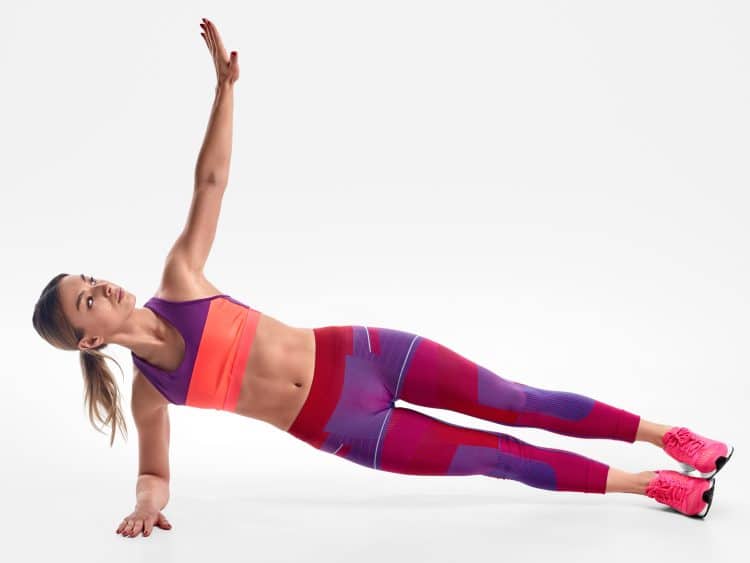
4. Side planks
While planks work your entire core, they primarily emphasize your rectus abdominis. Switching to side planks provides more work for your obliques. As the obliques are every bit as important as your abs for appearance and function, it’s always worth including them in your abs workouts.
How to do it:
- Lie on your side and rest on your elbow. Your body and legs should be straight. Brace your abs.
- Lift your hips up so your shoulders, hips, and feet form a straight line. Tense your entire core as hard as you can.
- Hold for as long as possible, relax, and then swap sides.
- Make this exercise harder by lifting your uppermost leg.
5. Oblique crunch
As you’d expect from an exercise with obliques in its name, oblique crunches train your oblique muscles, which are basically your waist. While this exercise is pretty straightforward, it’s an effective way to work these all-important muscles.
How to do it:
- Lie on your left side with your hips square, and your legs bent. Place your left hand on the right side of your waist to provide feedback from your working muscles. Put your right hand on the side of your head.
- Use your uppermost abs and obliques to flex your torso and draw your right shoulder down toward your hip. Move slowly and deliberately, contracting your obliques as hard as you can.
- Pause at the top of each rep for 2-3 seconds, lie back down, and repeat.
- Roll over and do the same number of reps on the opposite side.
6. Butt-ups
With no bar to hang from, and no captain’s chair to use, you may be wondering how you’re going to do hanging knee and leg raises with nothing but an exercise mat. Good news; you can work the same muscles with butt-ups. This might not be the most challenging abs exercise, but it can still be effective if you leave it to the end of your mat workout when your muscles are tired.
How to do it:
- Lie on your back. Brace your abs and raise your legs so they are straight and vertical. Press your lower back into the floor. Put your arms on the floor by your sides for balance. Rest your head on the floor to relax your neck.
- Without using your arms, lift your butt off the floor and push your feet up toward the ceiling. Try to keep your legs vertical, as moving them toward your head will make this exercise easier.
- Without dropping your legs, lower your butt back down to the floor and repeat.
- Increase abs engagement by exhaling forcefully as you lift your butt and inhaling as you lower.
7. Bicycle crunch
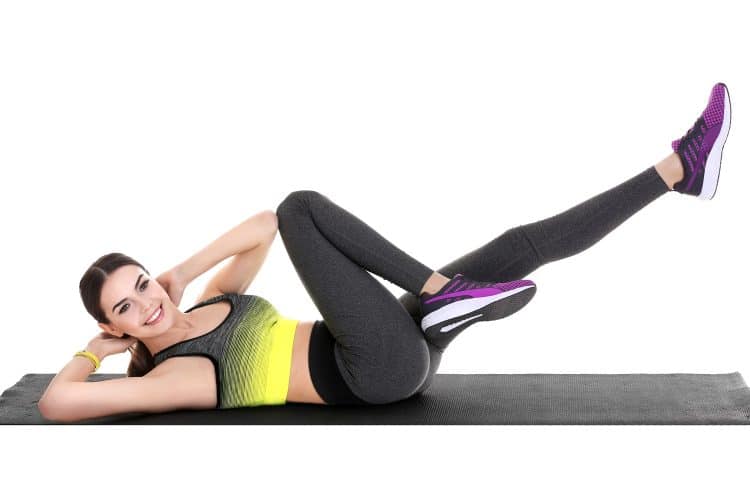
Looking for a mat exercise that trains your abs and obliques at the same time? Look no further than bicycle crunches. This is an excellent exercise if you want to work your entire core but don’t have a lot of time to spare.
How to do it:
- Lie on your back with your legs straight. Place your hands on your temples, brace your abs, and lift your feet a few inches off the floor. Press your lower back into the floor.
- Bend one leg and pull your knee in toward you. Simultaneously, lift your head and shoulders, twist your upper body, and touch your opposite elbow to your bent knee.
- Return to the starting position and repeat on the other side.
- Continue alternating legs for the duration of your set.
- You can also do this exercise with your straight leg resting on the floor, which is considerably easier.
The Best Mat Exercises
While it’s nice to have a gym full of workout equipment at your disposal, you can achieve a high level of fitness armed with nothing but an exercise mat. People have been exercising successfully with just their body weight for thousands of years, and if they did it, so too can you!
While some people may see mat-based workouts are limiting, they really don’t need to be. After all, there are hundreds of great bodyweight mat exercises to try.
So, don’t use lack of equipment as an excuse not to work out. With nothing but an exercise mat for comfort, you can train virtually every muscle in your body.
And best of all, you can do mat-based workouts at home, and once you’ve bought your exercise mat, it won’t cost you a cent!


