Band wrist curls are an exercise variation of a popular technique used for decades to beef up the inner forearm. Responsible for bending the wrist toward the palm, your wrist flexors carry out the movement. Sounds simple enough, right? Well, not exactly. While band wrist curls are essentially just flexing the forearms against resistance, there will be a learning curve for most people starting out. You’ve got to find the right band length for optimal resistance, ensure symmetrical training, and use an effective range of motion, which are all covered in this guide.
So what are the advantages of using bands over weights? Less strain on the wrists, and the safer nature of resistance bands. Anything else you need to know? Let’s go more in-depth on band wrist curls.
Muscles Worked During Band Wrist Curls
We need to be very intentional with wrist curls, maximizing how we stimulate the inner forearm flexor muscles. Let’s learn a little about their anatomy below.

Forearm Flexors
When you curl a weight, armwrestle, or flex your biceps, you’re activating the forearm flexors. They’re placed on the inner lower arm on the same side of your palm and elbow crease. Therefore to train them properly, we need to replicate the aformentioned movements.
Band curls are a nice way to accomplish forearm flexion because they’re lower impact, and can be easier on the wrists since the load picks up as the band stretches.
How To Do Band Wrist Curls
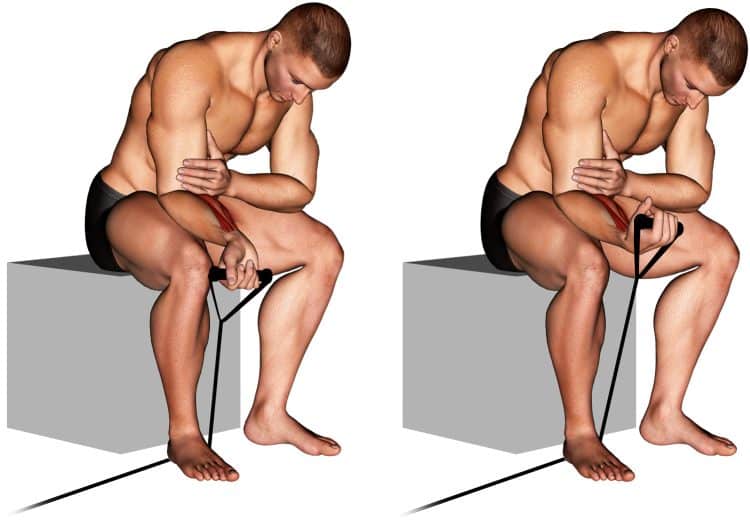
We’ll show you the most popular band wrist curl technique which is performed seated with the arm bent and elbow resting on the thigh. Then later on in this guide you can find the many different versions of this exercise, and try them all to see which ones hit the spot best.
Steps
- Sit at the edge of a bench, chair, stool, etc.
- Grab the end of your band by its handle or the rubber in either hand, then anchor the other end under the same side foot.
- Bend your arm to roughly 90 degrees and rest it atop the same side thigh with the palm facing up and let your wrist hang freely off the edge of your knee or inner thigh.
- From here make sure there’s no slack in the band when the wrist is extended (Bent all the way in the opposite direction), as we want there to be tension from start to finish of every rep.
- Now slowly curl the curl band up with your wrist and squeeze your forearms muscles.
- Gently reverse the motion by fully extending the wrist, and repeat for the optimal number of repetitions.
Here’s one way to do band wrist curls.
Benefits of Band Wrist Curls
Such a great little exercise for the forearm muscles, band wrist curls are low impact, don’t require too much energy, and give you a wicked forearm pump. Let’s describe its benefits in more detail below.
Get a Nice Forearm Pump
Unfortunately, for most of us mere mortals scarfing down some spinach just won’t cut it. A very genetic muscle, getting decent forearms can require lots of pulls, curls. We’ve even heard the popular recommendation to train them ever day or with high frequency.
Band wrist curls are a great way to not only pump up your forearms before a night out on the town (Ladies love veiny, vascular forearms), but the extra stimulation may be good for lower arm development.
Build Grip and Wrist Strength
Wrist curls aren’t just for the forearm muscles, they’ll strengthen your wrists too. Especially as you implement progressive overload, increasing both the resistance and repetitions. This should directly benefit your other exercises, increasing your work capacity and decreasing injury risk.
It’s also important to mention the beneficial effects of training the joints to preserve bone density and your muscles, especially during the aging process (1).
Good Exercise for Golfer’s Elbow
Where tennis elbow causes pain on the outer elbow, golfer’s elbow affects the inner elbow, where forearm muscles connect to tendons at the bony bump between where the upper and lower arm meet at the elbow crease.
Not unique to golfers, although common, baseball players, and anyone who uses excessive force when flexing the wrist can develop this issue. Band wrist curls are especially helpful in rehabbing the forearm, since the band starts off easy and offers more resistance as you go.
Band vs. Weight
A band is less bulky, and the weight won’t fall or shift onto the wrist like a dumbbell or barbell can. So it’s a bit safer for those who still need to work on their form. However, more experienced exercisers shouldn’t have a problem with either.
Common Mistakes During Band Wrist Curls
It’s all too easy to screw up what should be low stress complementary exercise like band wrist curls. And we don’t want you to make these common mistakes, and derail your potential progress.
Doing Too Many Reps
The goal isn’t to set a wrist curl world record, but create some progressive stimulus in the forearms over multiple workouts. You can train in higher rep ranges (25-35) but there should be a struggle toward the end of each set. Although, we typically like the 10-20 rep range for this exercise. Both can be beneficial though.
That means you need to create some resistance so the exercise is not too easy. So either shorten the band or use a stronger one.
Training Asymmetrically
This is where many people go wrong when using resistance bands, especially training one side at a time. They don’t even realize it, or the band tends to move during the movement. Well, the fact that bands create resistance and can be used as a training alternative means that it should be taken just as seriously.
Therefore, you need to ensure the band is of equal length on the left and right side. Usually making a note or mentally dividing the band into four sections keeps things consistent.
Asymmetrical training can also entail uneven range of motion. Whether you do partial or full reps, do the same for both wrists.
Not Feeling It
Don’t copy a technique if it doesn’t feel right for you. You may need to make some minor tweaks, or adjustments, or use a different position in order to feel like the exercise is working the target muscles. Doing wrist curls seated can feel awkward for some people, and it’s not best to continue.
Variations and Alternatives of Band Wrist Curls
We’ll show you some great similar wrist curls as well as other movements that train the forearms and grip even better.
Standing Band Wrist Curls
The primary example in this guide is performed seated but most people like variety, and oftentimes the standing version feels better and less awkward. You can do variation with so many different hand and arm positions too, which makes it a favorite choice. In front, behind the back, arms out to the sides, palms facing away, toward you, or held neutral, your options are plentiful.
Steps
- Grab your band in both hands and anchor it down with two feet. Spread your stance so that there’s no slack in the band when the arms are straight down by your sides or in front of your thighs.
- Now simply curl your hand up toward the wrist, reverse, and repeat.
Band Reverse Wrist Curls
We’ve also typed up a full guide on the opposite of a band wrist curl. Working the upper or knuckle side of the forearm, you’re getting into different muscles too, namely the brachioradialis. Band reverse wrist curls offer some of the same benefits of its inverse counterpart, and we like how easy it is to access.
Cable Seated Wrist Curls
We like these more than even a dumbbell or barbell curl because the pulley system creates resistance no matter the angle or position of your arms. Therefore, you have more options to train your forearms and grip. And at the top of each rep, there’s no chance to rest as the pulley demands you resist its opposing forces.
Recreate the same seated bent arm position for this variation or do the standing cable wrist curl which is just as good!
Free Weight Wrist Curls
If you’re close to a dumbbell or fixed barbell rack you may like the convenience of free weight wrist curls. The advantage over band curls is there are no changes to the resistance, unlike a band’s ever-increasing resistance as it stretches and lengthens.
Free weights wrist curls are a great variation but too often we’re tempted to use bad form. Like rolling the weight to the delicate fingertips, to using too much weight, taking tension off the forearms with bad form.
For this variation, the hand should always be lower than the wrist for optimal tension and contraction. This is also safer when using heavier weights, to prevent straining the wrists.
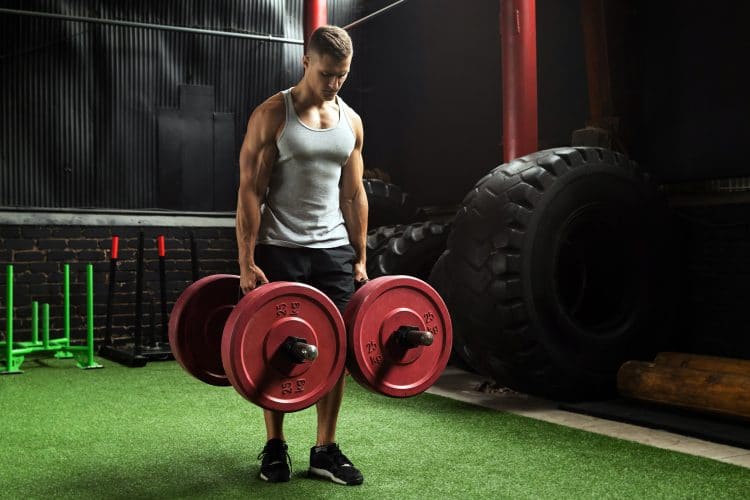
Farmer’s Walk

Simply picking up a weight in your grip and walking for a distance. Farmer’s walks are a strength competition event that tests forearm, grip, and mental strength. You may not be able to train to your future potential because your grip struggles to keep up. This is often the case for beginners or those with naturally weaker wrist and grip strength.
In big lifts like deadlifts, or even weighted pull-ups, the grip can give out before the muscles do. Cutting the fun, and gains short.
Forearm Roller – The Right Way To Do It!
A more fun and challenging way to train the biceps is with a roller device. It’s essentially a short bar or stick with a long strap attached to it. You then connect your weight to the end of the strap and try to roll it up with both hands.
You can buy these but if you’re handy, an easy way is to drill a small hole in the center of a short but thick plastic tube (PVC), then thread a long strap through it. It’s portable and can even fit in your gym bag.
Wrist rollers work both the forearm flexors and extensors, however, most people waste a lot of energy by holding their arms straight our in front of them. Instead, you should keep the elbows close to the body with the arms bent to a 90-degree angle, and now you won’t exhaust the front delts before your forearms.
Here’s a full guide to the wrist roller exercise.
Below we included a short 4-minute video of wrist rollers. However, if you don’t have time to watch the full video clip, fast forward to the 1:33 mark for the technique.
Tips
- Try to focus on using the same amount of effort with both arms, doing equally full rotations.
- Keep the forearms above parallel for better activation of the brachioradialis muscle in the top-lateral forearm.
- Start with a light weight and aim for 1-minute rollers.
Common Mistake
A bad habit without realizing is letting the weight fall after you roll it up. While it’s not exactly a crime, why not use your forearms to roll it back down and keep tension on the forearms?
Similar guide: Skinny forearms? Build your lower arms with these 13 exercises and workouts.
FAQ’s
What are the best sets and reps for band wrist curls?
Choose a band that allows you to start off moderately challenging, and finish with decent effort.
A good general recommendation is 2-3 sets x 10-20 reps.
What type of band should I use for wrist curls?
Most bands will work just fine from the looped, large rubberband type to the double sided ones with handles, and even more flimsy, very lightweight therapy bands.
Why do my wrists click or hurt when I do wrist curls?
If you feel pain or discomfort during wrist curls, it could be due to using too much resistance, your setup or form, overtraining or lifting heavy too often (Stresses the wrists), or even past wrist traumas.
You may need to adjust some things in your training to solve this problem.
Who should not do band wrist curls?
With the proper resistance, most people should be able to do wrist curls safely, and pain-free. It can even be therapeutic and useful for recovering from injuries, and common issues such as golfer’s elbow.
Wrapping Up
Got forearms? Train them anyway.
Your grip, training progress, and overall aesthetic balance depends on having capable lower arms. An important support system for the rest of the arm, and various movements, the forearms and flexors help transfer force through the body during physical daily activities. Band wrist curls are a beginner friendly technique that almost anyone can do to beef up their forearms, and the barrier to start is non-existent with the affordable nature of a resistance band!


