Your biceps and triceps are your show muscles. Whether you’re wearing a t-shirt or a suit, there’s no hiding a pair of loaded guns. By the same token, you can’t cover up puny arms.
Creating impressive upper arms takes more than pumping heavy iron. You must also understand your bis and tris’ biomechanics, anatomy, and function. In this article, we’ll give you everything so you can train harder and smarter.
Anatomy and Function — Biceps vs. Triceps
Before we get into upper arm anatomy, let’s take a moment to talk about why you need to know this stuff. After all, you’re not training to be a doctor; you simply want to make your arms bigger.
Well, it turns out that understanding the anatomy of your bis and tris is essential to ensure that you’re making your hard work in the gym count. By understanding their origin, insertion points, and movement patterns, you’ll know which exercises to choose and which to avoid to work them most effectively.
Biceps Anatomy
The biceps’ primary function is to flex the elbow. Two smaller muscles, the brachialis, and brachioradialis, assist only to a small extent. Biceps also help raise your arm forward, but this is mainly down by the front deltoid.
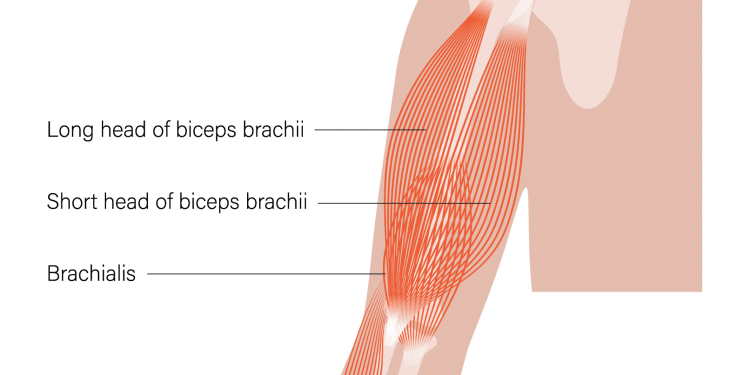
The biceps comprises two muscle heads, the short and long. The short biceps head originates from the coracoid process of the scapula (that’s the inner part of the outer tip of the shoulder blade). The long head originates on the glenoid tubercle of the scapula (the outer part of the outer tip of the shoulder blade).
The important point to note is that both the short and long heads have a single insertion point, converging to cross the elbow and attaching to the radius (the smallest of the two forearm bones).
Why is that important?
When you bend your elbow, you involve both the long and short biceps heads. That’s because they both pass through the elbow joint. Remember, too, that the elbow is a single hinge joint; it can only move in one direction.
Think about what that means. You have been fooling yourself if you’ve been doing specific exercises to hit the long head of the biceps and others to target the short head. When it comes to working the biceps, it’s all or nothing. Both heads are pulling on the same tendon in the same direction.
It’s a common belief that you can work the long and short heads separately to change the shape of your biceps. Yet, a simple look at anatomy shows that that’s impossible! It doesn’t matter whether you’re doing curls with an EZ curl bar, a straight-arm dumbbell, cables, a preacher bench, a hammer grip, or any other variation; both biceps heads will work together to flex your elbow.
Ideal Movement for Biceps Development
Because your elbow only does one thing, your only way to work the bicep is to bring your hand toward your shoulder, which requires elbow flexion. The position of your elbow in relation to your body is important. You’ve probably seen people doing cable curls with their elbows at their sides, and preacher curls with them in front of the torso. Even though the elbow is in different positions, the actual biceps movement is the same. So, you won’t get any extra benefit to that muscle from these variations.
When you begin a curl with your arm out vertically and your elbows straight (as when doing a high cable curl), you put way too much stress on the biceps tendon. This makes you very susceptible to a biceps tendon rupture. Hence, I recommend not doing this exercise.
The most natural position is to have your elbows at your sides, like in the standing dumbbell curl. This position does the best job of aligning with the strength curve of the biceps. According to that strength curve, the muscle is strongest at the beginning of the curl and weakest at the end of the movement.
Triceps Anatomy
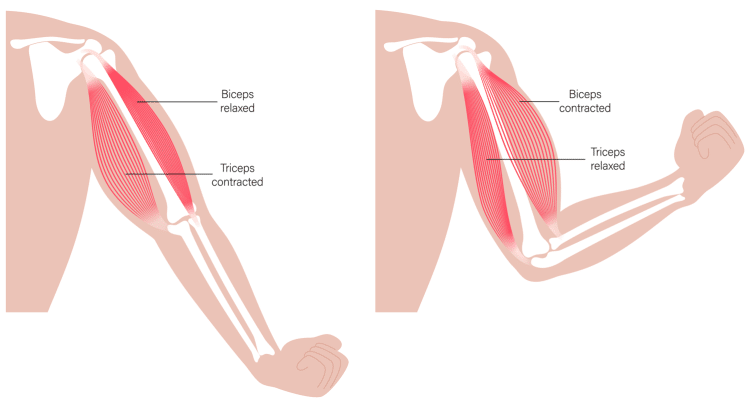
The biceps and triceps are antagonistic muscles. That means that when one flexes, the other relaxes. The triceps also move the elbow in the opposite direction to the biceps. So, its main job is to extend the elbow (the opposite of flexion). In simple terms, the triceps straighten your arm.
The triceps have three heads, hence the name. Like the biceps, the different heads have separate points of origin but the same insertion point.
The three triceps heads are the following:
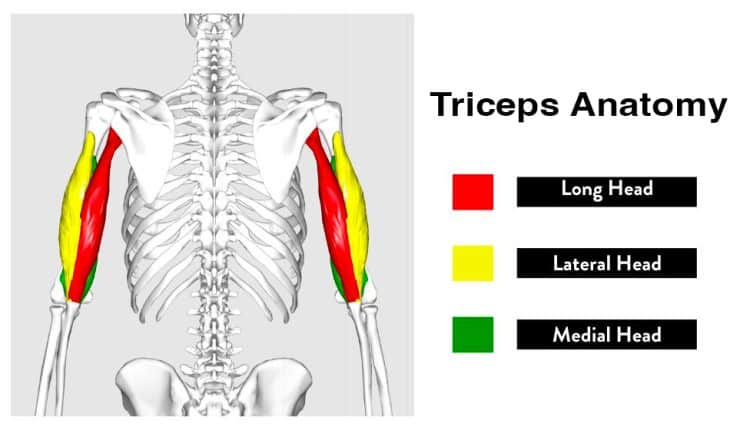 The lateral and medial heads originate on the back of the upper arm (humerus), just below the shoulder joint. The long head originates on the scapula, or shoulder joint, just under the shoulder socket. Because of this, the long head has minimal involvement when you pull your arm down. However, its main job, along with the other two heads, is elbow extension.
All three triceps heads insert on the ulna (the largest forearm bone). So, just as we’ve seen with the biceps, all three heads are involved when you perform a triceps exercise. You cannot do an exercise to isolate your long head, just like you can’t do one to hit the short head of the biceps.
While it’s true that doing an overhead triceps movement, such as the overhead cable triceps extension, will pre-stretch the long head of the triceps more than the other two heads, there is no connection between pre-stretching a muscle and making it stronger or bigger. So, there is no benefit to using an overhead position when working your triceps.
The best elbow position for the triceps is the same as for the biceps alongside the body. This is the most natural and the most comfortable position. Many people experience elbow pain from overhead triceps work; now you know you don’t have to!
Ideal Resistance Direction for Triceps Development
The exercise with the best direction of movement for the triceps will follow the strength curve of the muscle. That means it will be harder at the beginning and easier at the end (early phase loading) and involve opposite position loading (more on this soon).
Let’s look at the efficiency of one of the most common triceps exercises — the cable pushdown. Like the triceps, the forearm is the operating lever for the biceps. When you start the pushdown, your forearms are nearly parallel to the cable (direction of resistance). That means your operating level is neutral in the starting position, with no load on the triceps.
The problem here is that the strength curve of your triceps dictates that the exercise should be the hardest at the start when the muscle is strongest. When you extend your arms to the exerciser’s bottom position, the forearm becomes perpendicular to the cable. In other words, the triceps pushdown is a late-phase loaded exercise — the opposite of what we want.
If there was some way to make the forearms more perpendicular to the cable at the start of the movement, we would fix this problem and create a far more effective triceps exercise.
You can achieve this ideal direction of resistance by turning so that you are facing away from the cable machine. This places your forearms perpendicular to the cable in the start position, creating early phase loading, so the exercise is more challenging at the beginning. You’ll need a double cable pulley to do this so the cables can come down on either side of your head (rather than right through it!).
Biomechanical Principles That Affect Biceps & Triceps Training
Like the laws of gravity, several biomechanical laws, or principles, control how the body works. Some of them have a direct impact on our workouts. Here are some biomechanical principles directly related to your upper arm workouts. For each one, I’ll provide an example of how you can apply it to biceps and triceps exercises.
Levers
Your body has several levers. When a muscle pulls on the lever, movement happens. Many of those levels are bones. Weight training happens when we add resistance to a lever. When it comes to the biceps and the triceps, the lever that connects the weight to the muscle is the forearm bone or radius.
The amount of resistance put on the muscle depends on more than the actual weight you’re holding. It also includes the magnification caused by the length of the lever, in this case, the forearm, as well as the direction of the resistance in relation to the muscle.
When a lever is parallel with the resistance’s direction, we say it is neutral. When you are in the start position of a standing dumbbell, curl with your arms at your sides and your forearms hanging straight down, parallel with gravity. You could stand all day in that neutral position.
When you bring your forearm up to a perpendicular position to gravity ( a 90-degree elbow bend), you turn it into a fully active lever. That is the heaviest position of the curl.
The best exercises will put the muscle in an active position throughout most of the exercise and a fully active (perpendicular to resistance) position at some point in the movement.
Let’s put this into action by comparing two exercises for the triceps:
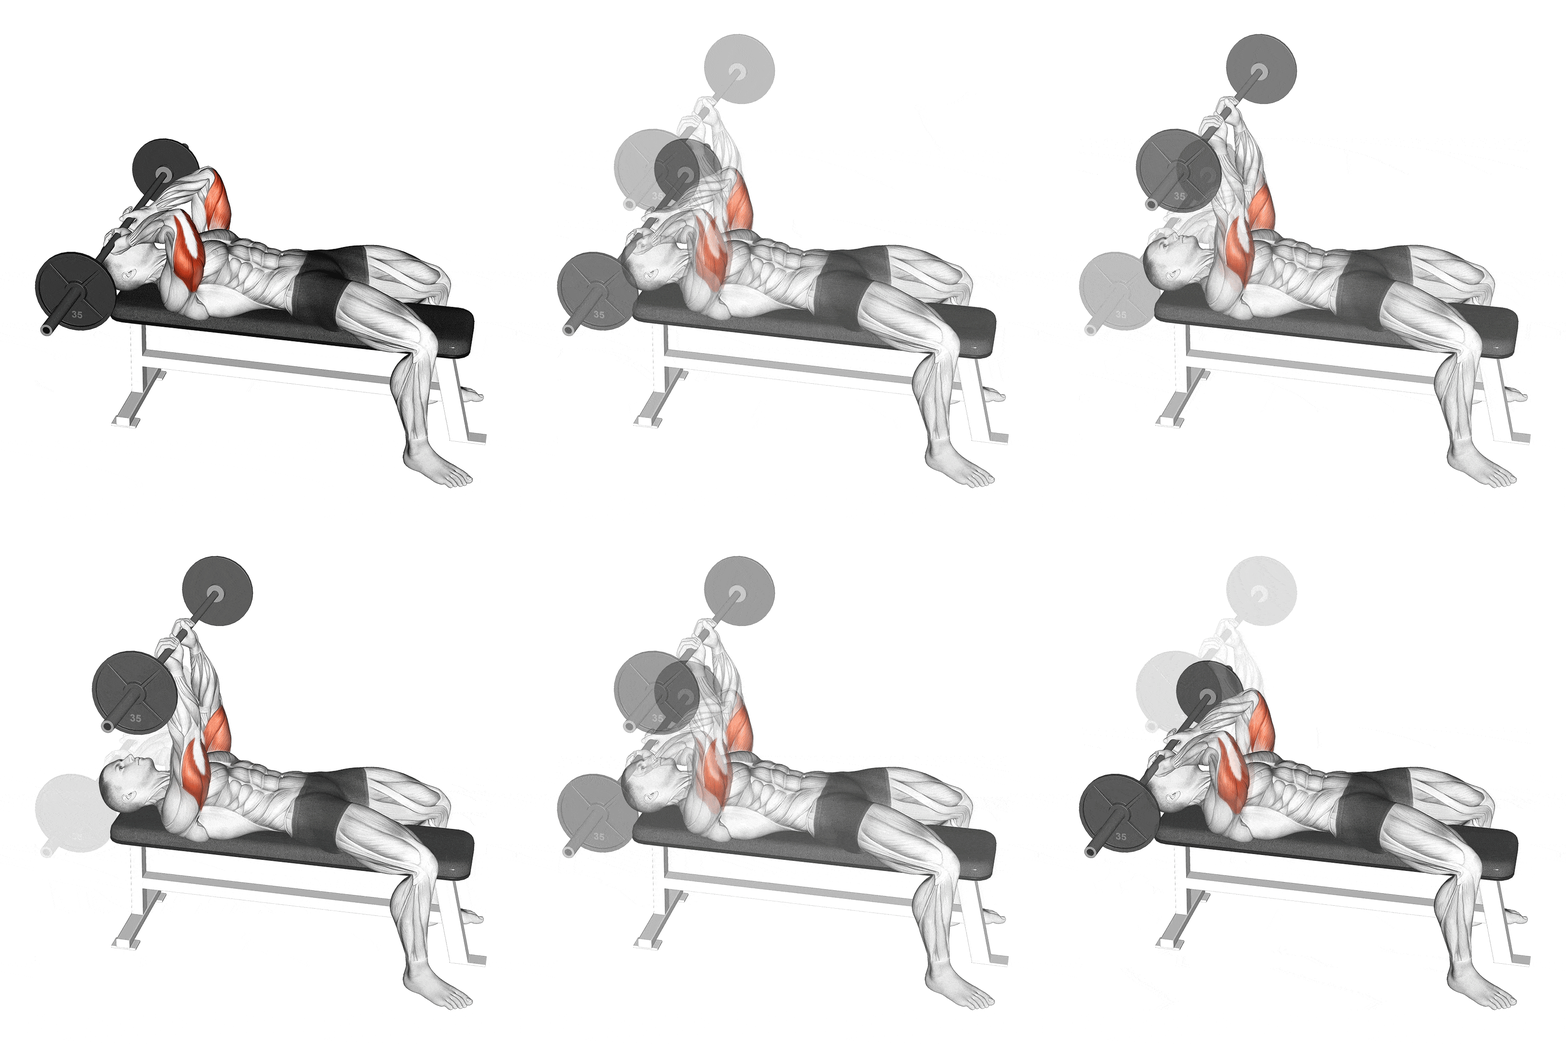
Skullcrushers start with your arms directly above your torso, parallel with gravity. This is a neutral lever position. It is fully active when you bend your elbows so the forearm becomes horizontal or perpendicular to gravity. At this point, the triceps are fully loaded.
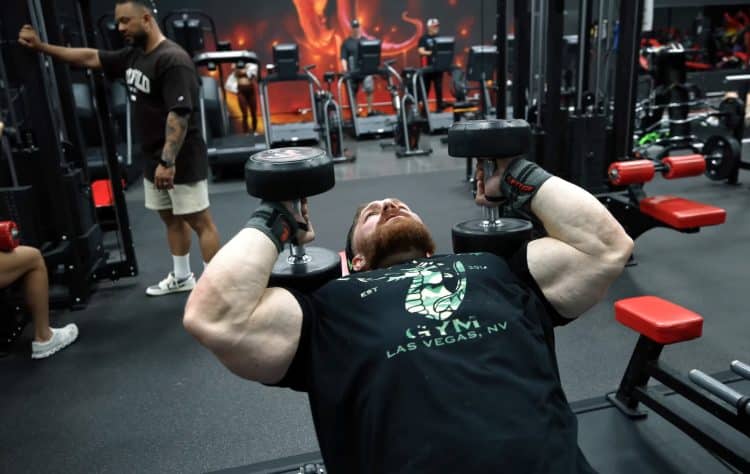
Remember that the load on the muscle is more than just the weight in your hands. We can work out the actual resistance on the triceps by multiplying the weight by the length of your forearm.
Let’s say you are using a 25-pound weight, and your forearm is 12 inches long. To work out the resistance on the triceps at the fully active point of the exercise, we need to multiply 25 pounds by 12.
25 x 12 = 300 pounds
That means that each tricep is getting 300 pounds of resistance at the most challenging part of a skullcrusher when you’ve got 25-pound weights in each hand.
Let’s now turn to the dip.
In the start position of the dip, your forearm is parallel to gravity, just as it would be if you were in the start position of a standing dumbbell curl. When you go down into the bottom position of the dip, your elbow bends to around 90 degrees, but the position of the forearm hardly changes. At best, it will move about 10 degrees back from your torso! Ten degrees is 11% of 90 degrees (full activation).
Let’s now consider the actual amount of resistance on the triceps. Let’s say you weigh 180 pounds, so that’s the resistance you’re lifting. That’s 90 pounds on each arm. So, we multiply the length of your forearm (12 inches) by 90.
12 x 90 = 1080 pounds
But that’s not the end. Now, we need to factor in the limited forearm movement. So we must multiply our total by 11%.
1080 x 11% = 118.8 pounds
We now have some solid physics-based facts to compare how good the skullcrusher is compared to the dip.
When you do a skullcrusher with 25-pound dumbbells, each tricep will get a 300-pound load at the most challenging part of the exercise.
When you do a dip, each tricep will get just 118.8 pounds of resistance in the hardest position despite lifting your 180-pound body weight.
From this, it’s easy to see that the skullcrusher is a very efficient triceps exercise, but the parallel bar dip is not.
From this, we learn two important lessons:
- Not all biceps and triceps exercises are equal.
- We can use physics to work out which exercises are the best.
Mechanical Disadvantage
The concept of mechanical disadvantage is a natural extension of what we have already learned about levers. It states that you need a lot more force to contract a muscle when it has to pull from a perpendicular compared to a parallel angle. We can see this in action when comparing the standing barbell curl with the preacher curl.
When you do the standing curl, your forearms are neutral levers in the start position. But when you do the preacher curl version, you start with your forearm at a 45-degree angle, which puts it halfway between vertical and horizontal. Yet the bicep is pulling the forearm from a mainly parallel angle because of gravity. This creates a mechanical disadvantage that puts a lot more force on your biceps and forearms. That’s why preacher curls are so much harder at the beginning but too easy at the top.
An exaggerated version of a preacher curl would be if you laid your arm out on a flat table with a weight in your hand and tried to curl the weight. That would create maximum mechanical disadvantage, so even a very lightweight would be hard to curl. In fact, you’d be likely to rupture the bicep if you tried to curl your normal curling weight this way.
It’s similar when you’re doing preacher curls. The mechanical disadvantage created puts you at risk of snapping the tendon when the elbow is nearly straight at the bottom.
This means that a preacher curl with free weights is a dangerous exercise that you should avoid. That doesn’t mean, though, that you can’t do the preacher curl at all. When you switch to a cable version by positioning the preacher bench in front of a low pulley cable, you completely change the direction of resistance. Now, rather than coming straight down because of gravity, it comes from an angle parallel to your forearms so that you’re starting with a neutral lever. This is a much safer version of the preacher curl exercise.
Resistance Curve
When you do a resistance exercise, you don’t experience the same difficulty level at every stage. Some parts are harder, while others are easier. If the difficulty levels are plotted on a graph, this will create the resistance curve for that exercise. Not all exercises have the same resistance curve. It changes depending on the direction of the resistance and the body’s position.
Muscles are stronger when they are extended and weaker when they are contracted. This is the muscle’s natural strength curve, stronger at the start of the movement and gradually getting weaker as you reach the end.
The best exercise for a muscle is one that follows the strength curve of that muscle. That means you should be doing exercises that are early phase loaded, meaning that they provide more resistance near the start and less resistance at the end.
An example of a triceps exercise with a resistance curve that matches the muscle is the skull crusher — it is harder near the start and easier near the finish of the movement. In this exercise, your forearm is perpendicular to gravity when the elbow is bent.
An example of a triceps exercise with a resistance curve that does not match the muscle is the dumbbell triceps kickback. In this exercise, the forearm is perpendicular to gravity when the elbow is straight. This exercise provides no resistance at all at the start of the movement when the triceps are strongest and max resistance at the end when the muscle is at its weakest. That is a bad combination.
As a result, you should include the skull crusher as a key tricep exercise and forget about the triceps kickback, which does very little to beef up the back of your upper arms.
Reciprocal Innervation
Most of the major skeletal muscles have an antagonist performing the opposite action. The biceps and triceps are antagonistic to each other. So, when the biceps contract, the triceps extend and vice versa. We are designed so that when one muscle contracts, the central nervous system prevents its antagonist from also contracting. This is called reciprocal innervation.
You can test this out by trying to contract your biceps and triceps at the same time. It is impossible. In fact, when you contract one, you will feel that the other is soft. That shows that the muscle is relaxed.
Let’s return to the triceps kickback to see how this principle can affect an exercise. When you perform the exercise by bringing your forearms forward of the elbow, the pivot point of the exercise and the biceps are activated. But this triggers reciprocal innervation, which shuts off the triceps. So, during half of what is meant to be a triceps exercise, your triceps are shut down, which is not what you want in an effective tricep exercise!
Reciprocal Innervation and Workout Structure
Besides helping us identify good and bad exercises, reciprocal innervation can help us structure our workouts. Because the antagonist muscle is relaxed when you work a muscle, it’s a good idea to work antagonistic muscle groups together. This guarantees that while you’re working your biceps, your triceps are completely relaxed and in recovery mode. It makes sense to do biceps/triceps supersets, where you pair a bi and tri exercise with no rest.
Active and Passive Insufficiency
When you do an exercise involving biceps contraction in a position where the triceps are overstretched, your biceps will weaken. This is passive Insufficiency in action, the weakening of a muscle by the over-stretching of its antagonist. This is because your central nervous system will be diverted to dealing with the over-stretched muscle.
The overhead cable curl for the biceps is an exercise where passive Insufficiency comes into play. The triceps are over-stretched with your arms stretched overhead to grab the bar. This compromises your position, so you cannot engage the true strength potential of your biceps. The result is a compromised exercise. Don’t do it!
Active Insufficiency is the opposite of passive Insufficiency. It happens when the operating muscle is over-contracted, so the origin and insertion points are too close together. It happens when a muscle crosses two joints. This is the case with the bis and tris, which cross the elbow and the shoulder joints. Active Insufficiency happens when you flex both of those joints. Once again, the overhead cable curl is an example of this. When you bring your arms above your head, your shoulders naturally flex, which moves the insertion of the biceps closer to the orogong. This combines with the over-stretching of the triceps to compromise the biceps.
How To Achieve Balanced Biceps and Triceps Development
As pointed out, the biceps and triceps are antagonistic muscle groups. In effect, they work together as a team. These two muscles work best when they have about the same level of strength and development. But problems can occur when you develop one more than the other. That’s why it’s important to give equal attention to both muscles.
The ideal strength ratio between the biceps and triceps is 1:1. That means they should be as strong as each other. In other words, the weight you use on a dumbbell curl should be about the same as when doing a triceps pushdown.
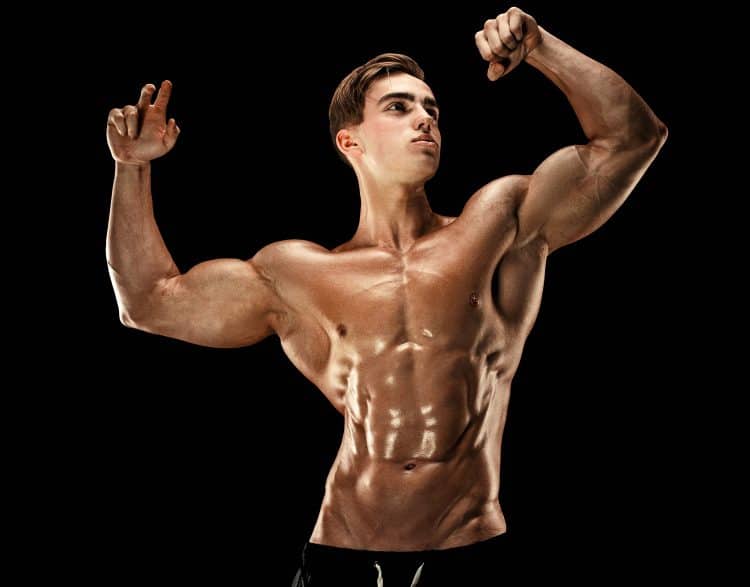
Balanced development is also important from an aesthetic point of view. I’ve seen many guys driven by the quest for big arms spend most of their time hammering their biceps with endless variations of curls, only to throw in a couple of sets of triceps pushdowns at the end, almost as an afterthought. They fail to realize that when your arms hang at your sides, as they are 90% of the day, your triceps make up two-thirds of your upper arm width. That doesn’t mean that you should train the triceps more than the biceps, but it does mean that you should give them equal attention.
Read also: Average Biceps Size: How Do You Measure Up?
How Many Biceps and Triceps Exercises Do You Need?
We live in a more is better society. I always see this in the gym as people constantly seek new exercises, different variations, and unique ways to work the muscles. Articles that list alternative exercises also rank high on Google. So, how many exercises do you need to work your biceps and triceps effectively?
The answer is that you only need one exercise for your biceps and one for your triceps. If that exercise meets all the biomechanical factors that make an exercise effective, why would you want to do anything else? To do so would be like getting bored with driving around town in a Ferrari and switching to a bicycle for no reason other than novelty.
Just as the Ferrari is finely tuned for speed and performance, the right exercise, perfectly aligned with biomechanical principles, can efficiently target and develop your muscles. Adding unnecessary variations without a clear purpose will downgrade your experience and results, much like replacing the exhilaration of driving a high-performance car with the simplicity of a bicycle.
There are some reasons to change your exercise regimen, but they have nothing to do with building muscle and strength. Instead, they’re all about your mind. Doing different exercises can add variety to your workouts, helping prevent boredom. That’s okay, but if you switch up your routine to keep it ‘interesting,’ you must be prepared to accept that your workouts won’t be as effective.
Some people believe that a muscle will ‘adapt’ to an exercise over time, making the movement less effective. But this doesn’t even make sense. A muscle works one way. It doesn’t change over time because it has gotten used to the stress that’s put upon it. What it does do is create more muscle mass and get stronger to meet the same stress next time. For continued gains, you need to increase the resistance progressively. But you do not have to change the actual exercise.
This focus on just one or two exercises goes entirely against the grain of what most people are looking for. But it is the most intelligent way. If you are doing eight sets for your bicep and another eight for your triceps, do all eight with the best exercise possible for the target muscle group. And keep doing it for the rest of your life!
Ideal Biceps & Triceps Training Frequency
To understand the best frequency to train your biceps and triceps, we need to know what happens to a muscle after your workout. The day after the workout, your strength and development will dip slightly. This causes what we call super-compensation, where strength and size increase, provided the muscle is being sufficiently fed and rested.
Super-compensation will peak after 2-3 days. Then, it starts to descend. That is the time that you want to train the muscle again. If you wait too long, you will return to square one every workout. So, the best frequency to train a muscle is every 3-4 days.
Best Set & Rep Scheme for Biceps & Triceps
When training the arms, all sorts of set and rep schemes have been promoted over the years, from 5 sets of 5 reps to 10 sets of 10 reps. But unless they are connected to the intensity level, they’re meaningless. After all, you could have ten sets of 10 with a weight and intensity that simply has you going through the motions.
So, the first step when discussing sets and reps is to drill down on the intensity level at which you will be working.
Your task is to provide your muscles with a degree of intensity that spurs growth while preserving training volume. That doesn’t mean you must train to fail in every set.
A comprehensive 2016 meta-analysis incorporating eight different studies concluded that “similar increases in muscular strength can be achieved with failure and non-failure training. Furthermore, it seems unnecessary to perform failure training to maximize muscular strength; however, if incorporated into a program, training to failure should be performed sparingly to limit the risks of injuries and overtraining.” [1]
To strike the right intensity balance, select a resistance operating at 80-90 percent of your threshold. So, if you perform ten repetitions, the initial six should feel reasonably manageable; from the seventh repetition onward, a challenge emerges, and the final three prove demanding, yet don’t deplete your strength entirely.
On your last set, you should go to failure, where you cannot get another rep out with good form.
So, how many sets and reps would you do at these intensity levels?
A 2017 study by Scheonefled had two groups of healthy young men performing either high rep (25-35) or low rep (8-12) sets for three sets of 7 different exercises to cover all major muscle groups. The groups trained three times per week on alternate days for eight weeks. The results showed that, while the low rep group had greater strength gains and the high rep group exhibited more muscle endurance, the actual muscle mass gains between the groups were similar. The researchers concluded that “(high-load) and LL (low-load) training to failure can elicit significant increases in muscle hypertrophy among well-trained young men; however, HL training is superior for maximizing strength adaptations.” [2]
Here is a rep scheme, based on these findings, for an eight-set single exercise workout:
- Set One: 30 reps
- Set Two: 20 reps
- Set Three: 15 reps
- Set Four: 12 reps
- Set Five: 10 reps
- Set Six: 8 reps
- Set Seven: 6 reps
- Set eight: 6 reps
Best Biceps & Triceps Exercises
In the previous sections, we used anatomy, biomechanics, and physics principles to identify good and bad biceps and triceps exercises. In this section, we’ll use those criteria to identify the five best exercises for the front and back of your upper arms.
5 Best Biceps Exercises
Exercise #1: Standing Alternate Dumbbell Curls
Benefits:
- Early phase loading
- Works each arm unilaterally
- Ideal elbow positioning at the side of the body
- Ideal resistance curve
Step-by-Step Guide:
- Stand with your feet shoulder-width apart, dumbbells at your sides, and palms facing toward your thighs.
- Keeping your elbows at your sides, turn the right wrist to the front and curl the weight to full contraction at the shoulder.
- Squeeze tightly in the top position.
- Lower under control, turning the wrist back toward the body in the bottom position.
- Repeat with the other arm.
Exercise #2: Seated Incine Alternate Dumbbell Curl
Benefits:
- Stricter version; eliminates lower body momentum
- Early phase loading
- Unilateral arm development
- Ideal resistance curve
Step-by-Step Guide:
- Set the angle of your bench to 75 degrees and sit on it with dumbbells in hand.
- Lean back on the bench and hang your arms down at your sides.
- Curl the right arm to full contraction from a starting position with your palms facing forward.
- Pause for a two-second count in the top contracted position.
- Lower under control.
- Repeat with the left arm.
Exercise #3: Standing Alternate Cable Curl
Benefits:
- Constant tension on the biceps
- Early phase loaded
- Unilateral training
- Ideal resistance curve
Step-by-Step Guide:
- Set up a pair of low pulleys in the machine’s lowest pin position.
- Stand about two feet in front of the machine, facing away from it, with the cable handles in your hands. Your palms should be facing your sides.
- Starting with your right hand, supinate the wrist to face forward. At the same time, start curling the handle up to your shoulder level.
- Squeeze your biceps tightly in the fully contracted position.
- Lower and repeat on the other side.
Exercise #4: Alternate Hammer Dumbbell Curl
Benefits:
- Engages brachialis and brachioradialis as well as biceps
- Early phase loaded
- Unilateral training
- Ideal resistance curve
Step-by-Step Guide:
- Stand with your feet shoulder-width apart and the dumbbells at your sides, facing your thighs. Hold the dumbbells in a hammer grip, with your thumbs facing forward.
- Keeping your elbows in at your sides, curl your right arm up and across your body to bring it to the opposite side of your upper chest.
- Squeeze the bicep tightly and then lower the weight under control.
- Repeat with the left arm.
Exercise #5: Chin-Up Hang
Benefits:
- Increases time under tension
- Great finisher exercise
- Early phase loaded
Step-by-Step Guide:
- Hang from a pull-up bar with your palms toward you and your pinkies about eight inches apart.
- In the start position, your body should be in a straight line.
- Pull yourself up so that your elbows are bent at a 90-degree angle.
- Hold this position, squeezing your biceps as hard as you can.
- Start with the goal of holding for 30 seconds and work your way up to one minute.
Read more: The 31 Best Biceps Exercises For Building Bigger
5 Best Triceps Exercises
Exercise #1: Dumbbell Lying Triceps Extension (Skullcrusher)
Benefits:
- Early phase loaded
- Works each arm unilaterally
- Ideal strength curve
Step-by-Step Guide:
- Position yourself on a 30-degree angle decline bench with a pair of dumbbells in your hands.
- Lie on the bench with your arms extended above your chest, dumbbells touching each other, and palms facing each other.
- Bring both dumbbells down to the sides of your head by bending at the elbows. Keep your upper arms stationary.
- Push through the triceps to return to the start position.
[sc name=”style-summary2″ ]
Pro Tip: The 30-degree decline bench places your triceps in the ideal alignment for full muscle fiber recruitment on this exercise. Do not use a weight that is too heavy for this exercise, as it will force you to bring your elbows away from your sides. This will take the emphasis off the triceps.
[/sc]
Exercise #2: Reverse Cable Pushdown
Benefits:
- Early phase loaded
- Ideal resistance curve
- Unilateral training
Step-by-Step Guide:
- Position the pulleys on a dual pulley cable machine at their highest vertical position and then adjust horizontally to align with your shoulders.
- Stand about a foot in front of the machine, facing away from it.
- Reach up to grab the cable handles and bring them down to the start position with your elbows in at your sides and hands at mid-chest level. Your upper arms should be slightly angled rather than squarely in at your ribs.
- Press down and out slightly to fully extend the arms, strongly contracting the triceps in the bottom position. In this finish position, your arms should be at a 45-degree angle from your body.
- Reverse and repeat.
Exercise #3: Triceps Pushdown
Benefits:
- Full range of motion
- More accessible than the reverse triceps pushdown version
Step-by-Step Guide:
- Set the pulley on a cable machine to its highest position. Attach the rope handle.
- Stand about 18 inches from the machine, facing it, and grab the rope handle ends with your palms facing each other.
- From a starting position with your elbows at your sides and your forearms at a 30-degree angle, press down to fully extend your arms.
- Return to the start position under control, keeping your elbows in at your sides.
[sc name=”style-summary-2nd” ]
Pro Tip: This version of the triceps pushdown is not as good as the reverse cable pushdown, as there is no early phase loading. However, many gyms do not have suitable double pulley cable machines that allow you to do the reverse version. This standard version is a suitable alternative.
[/sc]
Exercise #4: Seated Reverse Triceps Pushdown
Benefits:
- Early phase loaded
- Ideal resistance curve
- Unilateral training
Step-by-Step Guide:
- Position the pulleys on a dual pulley cable machine at their highest vertical position and then adjust horizontally to align with your shoulders. You may choose to put a rope handle on the end of each cable if you wish (see video below).
- Place a back-supported seat in front of the machine, facing away from it so that you are sitting about three feet away from the weight stacks.
- Grab the handles and sit on the machine.
- Bring the handles down to the start position with your elbows at your sides and hands at mid-chest level. Your upper arms should be slightly angled rather than squarely in at your ribs.
- Press down and out slightly to fully extend the arms, strongly contracting the triceps in the bottom position.
- Reverse and repeat.
Exercise #5: Diamond Push-Ups
Benefits:
- Great finishing exercise
- It doesn’t require equipment
Step-by-Step Guide:
- Get down on the floor and assume the high push-up position. Place your hands together under your chest so your thumbs and index finger touch. They should form a diamond position.
- Lower toward the ground. Your elbows will flare out as you go down.
- Push back to the start position once you have gone down as far as comfortable.
Read more: Best 23 Dumbbell Triceps Exercises and Workouts
Common Bicep Training Mistakes
Avoid these popular biceps training errors:
- Swinging from the hips: This takes all of the tension off the biceps, nullifying the effect of the exercise. To keep your back upright, bend your knees slightly and focus on isolating the bicep as you smoothly lift the bar. To eliminate backswing, try doing your curls with your back against a wall. You may have to lower the weight a little, but the bicep will feel it much more than if you are jerking and swinging with a heavy poundage.
- Limited range of motion: You see many people only going through a three-quarter motion with their curls. This limits stimulation. You need to move each rep from the thigh to the shoulder.
- Getting too complicated: More stuff has been written about bicep training than any other muscle. Because the biceps are the show muscle, people tend to overcomplicate the training, doing too much and ending up in an overtrained state. The reality is that the bicep is a small muscle group that gets a lot of stimulation from your other body part workouts.
- Too much weight: Don’t lift to impress others or keep up with your training partner. Lift to work the muscle optimally. That means using a weight that will challenge you to the max without forcing you to use sloppy form. Remember, your biceps muscle doesn’t know how heavy the weight is in your hand; all it knows is how hard it’s working.
Common Tricep Training Mistakes
Steer clear of the following triceps training errors:
- Poor form: Pay attention to keeping good form throughout the exercise. Use deliberate motions; don’t swing or jerk the weights. Avoid using momentum and contract your triceps fully in the end position.
- Partial range of motion: You need a full range of motion for full muscle engagement. Extend your arms fully until your triceps are fully extended.
- Going too heavy: Choose a weight that works your muscles without compromising appropriate form. Using too heavy weights might result in poor form and possible injury. Increase the weight gradually as your strength increases.
- Trying to isolate a triceps head: As explained earlier, it is impossible to work any of the triceps heads separately. Focus on the proven overall triceps developers in the previous section.
Wrap Up
This article has covered a lot about the most effective ways to train your biceps and triceps. Here’s a recap of the main points:
- The biceps flexes the elbow.
- The triceps extends the elbow and is the antagonist of the biceps.
- The biceps and triceps have more than one head but a single tendon insertion point. As a result, you cannot isolate separate heads of either muscle.
- The best exercises pull the muscle in an active position.
- Avoid exercises that are mechanically disadvantaged (i.e., free weight preacher curl)
- Choose exercises that are early-phase loaded.
- Work biceps and triceps together to take advantage of reciprocal innervation.
- Avoid exercises that involve passive and active insufficiency (i.e., overhead cable curl)
- You only need one exercise for each muscle group.
- Train your arms every 3-4 days.
- Do eight sets per muscle group, with reps ranging from 6-30.
- Use an intensity level of 80-90% on most sets, going to failure on the last set.
Much of what you’ve learned in this article goes against the grain of conventional gym lore. But it makes sense. It also works. Start implementing these suggestions in your workouts, and you will be rewarded with more effective muscle stimulation and, ultimately, bigger, stronger biceps and triceps.
References
- Davies T, Orr R, Halaki M, Hackett D. Effect of Training Leading to Repetition Failure on Muscular Strength: A Systematic Review and Meta-analysis. Sports Med. 2016 Apr;46(4):487-502. doi: 10.1007/s40279-015-0451-3. Erratum in: Sports Med. 2016 Apr;46(4):605-10. PMID: 26666744.
- Schoenfeld BJ, Peterson MD, Ogborn D, Contreras B, Sonmez GT. Effects of Low- vs. High-Load Resistance Training on Muscle Strength and Hypertrophy in Well-Trained Men. J Strength Cond Res. 2015 Oct;29(10):2954-63. doi: 10.1519/JSC.0000000000000958. PMID: 25853914.

